
Objectives
Defining shape attributes and classifying shapes based on these attributes will help students become more proficient in their understanding of two-dimensional geometric shapes. Students are going to:
- acknowledge and illustrate two-dimensional shapes with designated characteristics.
- recognize hexagons, pentagons, quadrilaterals, and triangles.
Lesson's Core Questions
- How are real-world situations or problems represented or sketched using spatial relationships, such as shape and dimension?
- What scenarios can be modeled, described, and analyzed using geometric properties and theorems?
- What relationships in mathematical contexts can patterns be used to describe?
- How can identifying regularity or repetition help with problem-solving efficiency?
- How can mathematical reasoning and problem-solving be aided by applying the properties of geometric shapes?
Vocabulary
- Attribute: A characteristic of a shape.
- Congruent: The same as.
- Hexagon: A polygon with six sides.
- Pentagon: A polygon with five sides.
- Polygon: A shape made up of connected line segments.
- Quadrilateral: A polygon with four sides.
- Side: A line segment connected to other segments to form a polygon.
- Triangle: A polygon with three sides.
- Vertex (plural Vertices): The corners of a polygon.
Materials
- chart paper
- student math journals (notebooks in which students record new vocabulary)
- 8-inch squares of paper for each student
- two 8-inch squares of paper for teacher demonstration
- 12-inch by 18-inch drawing paper for each student
- geometry shape finders, created before instruction (M-2-5-1_Geometry Shape Finders)
- Folding Square Example (M-2-5-1_Folding Square Example)
- Shape Sorting and Patterning Cards (M-2-5-1_ Shape Sorting and Patterning Cards)
- Shape Sorting Assessment (M-2-5-1_Shape Sorting Assessment and KEY)
- entrance ticket (M-2-5-1_Entrance Ticket Lesson 1 and KEY)
- exit ticket (M-2-5-1_Exit Ticket Lesson 1 and KEY)
Assessment
- You can use the M-2-5-1_Shape Sorting Assessment and KEY formative assessment, which is a paper-and-pencil exercise, to guide instruction.
- Assess student understanding using an exit ticket (M-2-5-1_Exit Ticket Lesson 1 and KEY). For every student, create a duplicate copy of the exit ticket. Once the class is over, distribute the tickets and gather them from the students as they exit the building.
- Utilizing the Shape Sorting and Patterning Cards (M-2-5-1_ Shape Sorting and Patterning Cards), assign students to sort shapes based on attributes. On a large sheet of paper, they should draw and label categories, then adhere the cards to the proper spots.
Suggested Supports
Explicit instruction, modeling, scaffolding, and active engagement
W: The lesson's main focus is geometry, and students gain more understanding of the subject by recognizing and characterizing shapes and their characteristics.
H: Give students some time to search for and note any shapes they come across in the classroom.
E: Give students a paper-folding exercise to make a variety of shapes, then have them compare and contrast each one.
R: Teach students new vocabulary and have them classify the shapes according to their characteristics (number of sides/vertices).
E: Use class discussions or small-group work to assess students, and give them the chance to ask questions and get clarification when needed. Additionally, evaluate students' knowledge of the characteristics of triangles, rectangles, and squares using the exit ticket.
T: For students who have mastered the material, offer extra enrichment activities. Give those who require more practice—individuals or small groups—more time and assistance to grasp the material.
O: The main objectives of this lesson are for students to recognize, define, and divide two-dimensional shapes in addition to familiarizing themselves with their characteristics.
Teaching Procedures
This lesson's main objective is to recognize and describe two-dimensional shapes. At the beginning of the lesson, students have the chance to go over some of their favorite shapes. And then they use geometry shape finders to locate those shapes in the surrounding environment. They fold paper to make unfamiliar shapes after recognizing familiar shapes in a novel environment. The goal of this is to teach students that shapes come in a variety of forms and can be characterized by their characteristics. Following that, students sort the shapes and talk about their shared characteristics as a way to reflect on their understanding of shapes.
"We will carry on with our geometry work today. We'll go over a few vocabulary terms related to geometry. We'll keep adding to our wall of geometric concepts throughout our unit. We'll discuss the forms that we encounter in the classroom. After that, we'll fold paper to create new shapes, which we'll then arrange based on their characteristics. The environment we live in is full of various shapes. Certain shapes you are already familiar with. Let's list the shapes on this chart."
On chart paper, note the students' answers. While students are sharing, review vocabulary terms such as "side" and "vertex" and remind them that shapes are described by their characteristics. (For instance, "A square has four sides and four vertices, or corners.")
Geometry Shape Finder Hunt
"Everything has shapes. You will spend the next few minutes searching our classroom for shapes. I'll be handing out geometry shape finders to each of you. (M-2-5-1_Shape Finders in Geometry)." Hold the shape finders up and look at the shape on each one. "You are to use your geometry shape finder to identify only those shapes, and then record those shapes in your math journal. My geometry shape finder, for instance, has a circle on top. I'll go through it and try to find anything in the space that's circular."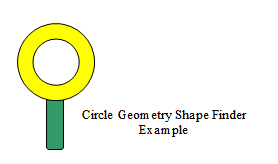
Like a magnifying glass, hold the geometry-shaped finder up to your eye and look through it.
"Oh, that's right! There's a penny here. Its shape is identical to my geometry shape finder. I'll have to write it down in my math journal."
Give the students their geometry shape finders, and give them five to seven minutes to search for shapes. In their math journals, students should note their outcomes. After regrouping the class, have a discussion about the shapes that are present in your space. Assign appropriate vocabulary to the students' descriptions of the shapes and their characteristics. After exchanging shape finders, instruct students to search for a different shape. Repeat the process until every student has had a chance to search for a variety of shapes.
Folding Paper to Make New Shapes
You will need two 8-inch square sheets of paper for this activity, one 8-inch square sheet of paper for each student, and one 12-by-18-inch drawing paper for each student.
Say, "Now let's examine a few different shapes. Let's count the number of vertices and sides on each shape as we examine it. I'll begin with my square."
Show the students one of the eight-inch squares. "What is the number of sides in this square?" (4) "How many corners, or vertices, is this square made up of?" (4) Write the answers that the students submit on the board or chart paper in the manner indicated below.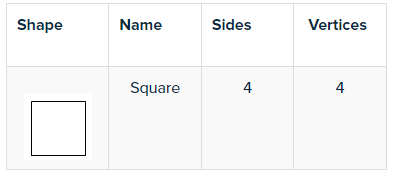
Provide space for students to add more rows later on when they copy the chart into their math journals. "I'm going to fold my paper several times now. Observe closely as I fold my paper. When I'm done, I'll give each of you a square piece of paper and walk you through folding it step-by-step. See how I fold my square right now."
Hold the 8-inch square piece of paper so that everyone in the class can see how to fold it.
To fold the paper, use the procedures listed below. The Folding Square Example (M-2-5-1_Folding Square Example) includes illustrated instructions. Explain to students what you're doing as you fold.
1. Following the vertical line of symmetry, fold the square in half. Make sure the crease is well-defined.
2. Get the square open.
3. Following the symmetry's horizontal line, fold the square in half. Make sure the crease is well-defined.
4. Get the square open.
5. Reach the intersection of the two lines of symmetry at each corner vertex. Make sure to fold and crease precisely.
6. For every corner vertex, repeat step 5.
7. Now that the square is open, you can see every fold.
"You will need to fold the square on the creases you made after folding your paper to create new shapes. For instance, I can form a shape if I fold my square in half. What is my shape?" (rectangle) "I indeed made a rectangle. Keep in mind that a square is also a rectangle. I shall now note this shape in our chart." On the chart, trace the rectangle. Label the second column "Rectangle." "Now let's increase the number of vertices and sides in our chart. How many sides does a rectangle have?" (4) "What is the number of vertices in it?" (4) Fill in the chart with this information. In their math journals, students will complete their own charts as they write the information on the board.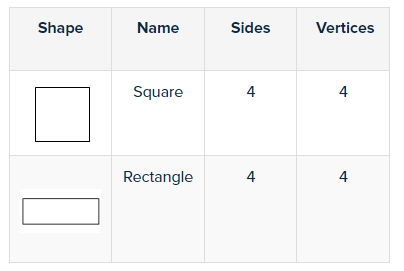
Students ought to observe that the square and rectangle possess four sides, four vertices, and four right angles. Say, "Quadrilaterals are a larger group of polygons that include both the square and the rectangle. A quadrilateral always has four sides, four vertices, and four angles."
Assign an 8-inch square and a 12-by-18-inch drawing sheet to every student. "It's time for you to start folding now. First, let's fold and create creases. Here are the procedures."
Lead students through the process of folding. Model each step using the second 8-inch square piece of paper. It could take a few minutes to complete. Students will have the following creases when they unfold their squares:
Let students fold the square a few times to experiment with the various shapes they can create once everyone has finished. Remind students not to make any new creases; instead, they should only use the ones they have already made to form shapes. Students should trace the new forms they create on their drawing paper. Along with naming each shape, they should indicate how many sides and vertices it has. The various shapes they can form are as follows: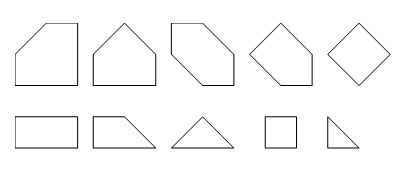
Shape Categories
Place several pieces of chart paper around the classroom while the students are making shapes and tracing them on the paper. Put some characteristics or categories on the chart paper, like "Shapes with four sides" or "Shapes with more than four vertices." Select a few students and have them trace their shapes in the appropriate category on the classroom chart paper while you go over their work.
Discuss each category's shapes as a class. Presenting new terms to the class, like quadrilateral, pentagon, and attribute, is a great idea.
Discuss which shapes are "same" and what that means as the students trace their shapes. Present the concept of "congruent," which describes how two shapes will match if they are stacked on top of one another. Congruent shapes will be demonstrated multiple times, either by you or by the students.
We'll also introduce some colloquial terms related to transformations in this conversation. Perhaps you should clarify and say, "This is the same as that, except it has been turned and flipped over."
As students are folding and discovering new shapes, you will have the chance to evaluate them through questions and discussions. To help students better understand concepts or gauge their learning, you might want to put them in small groups.
Here are some examples of questions:
"You folded your square once. What shape did you make? What about two times?"
"Did you make any congruent shapes? How are you aware?"
"I see that your shapes are similar. What makes these two shapes similar, in your opinion?"
"What does this problem challenge you?"
"I want to know if we can create a shape with fewer than four sides."
"What geometric form will have the greatest number of vertices?"
Ensure that students are writing down details about the shapes on their paper. Sometimes, when students present their answers, they claim to have a new shape, but what they have is a flip or rotation of a previously mentioned shape. By stacking shapes on top of one another, make sure to highlight this to your students.
Extension:
To meet your students' needs throughout the year, implement the strategies and activities listed below.
Routine: To evaluate students' shape knowledge, use the entrance ticket (M-2-5-1_Entrance Ticket Lesson 1 and Key). An entrance ticket serves as a useful preassessment tool as well as a means of reinforcing skills from a prior lesson.
Expansion: Students can practice sorting shapes based on their attributes by using the Shape Sorting and Patterning Cards (M-2-5-1_ Shape Sorting and Patterning Cards) when they're ready. Before sorting cards into the proper categories, students should create their categories.
Small Groups: The paper-folding task might be challenging for some students. If necessary, get some 8-inch folded squares ready ahead of time. In a small group, walk students who require additional practice through a series of folds. Cut down on the quantity of folds needed. After that, assist them in noting how many sides and vertices each shape has.
What's My Rule?: Students can play What's My Rule? as a brief transitional exercise or warm-up. Give a group of shapes to one student to divide into two or more groups. From the class's observations of the groups, the sorting attribute of the students will be deduced.